Manage Workflows
This information is for system administrators who are responsible for setting up workflows in ProLinkAIM.
ProLinkAIM's automated workflows help manage your processes, files, and checklists through systematically generated emails that can be sent to external entities or internal users based on certain conditions and triggers.
Workflow functionality in ProLinkAIM allows users to associate workflows automatically based on matched "associated object" criteria. Either a specific event or a specific schedule can trigger a workflow. When you create a workflow, you specify the associated object. Think of the associated object as a screen in ProLinkAIM. There are some exceptions to this, but equating the associated object to a screen helps to become familiar with the concept.
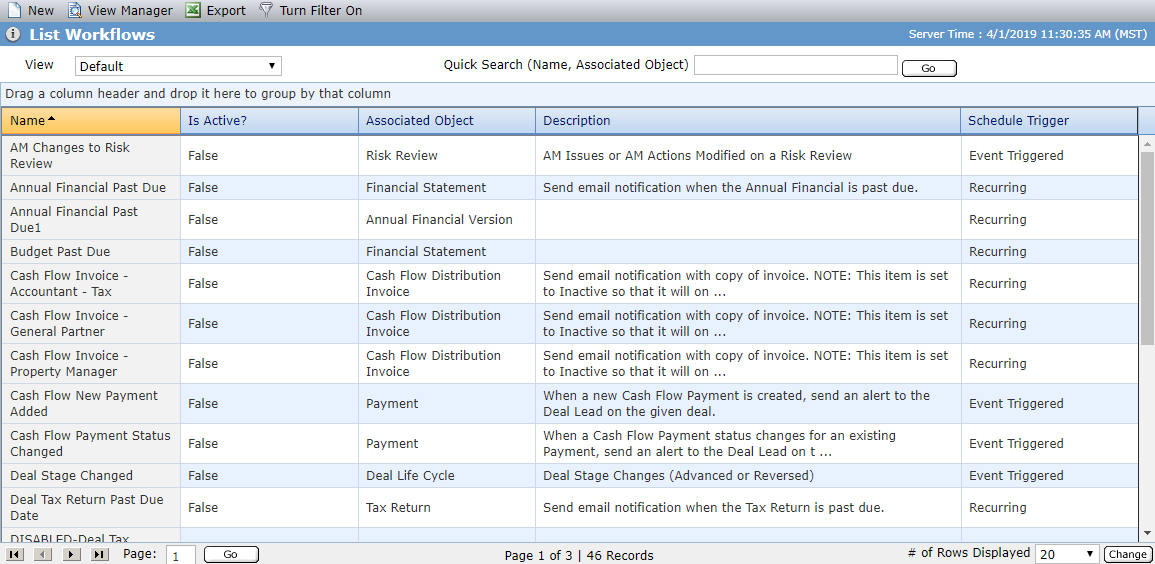
Navigate to the Admin menu, and then select Workflow in the left navigation panel. The List Workflows screen opens.
The screen is a data view screen, which means you can filter, sort, search, and create custom views, like with other data views.
Tip
Using Quick Search, search for a workflow by name or associated object.
Click a row to open the Workflow File record and view its details. The Edit Workflow screen opens.
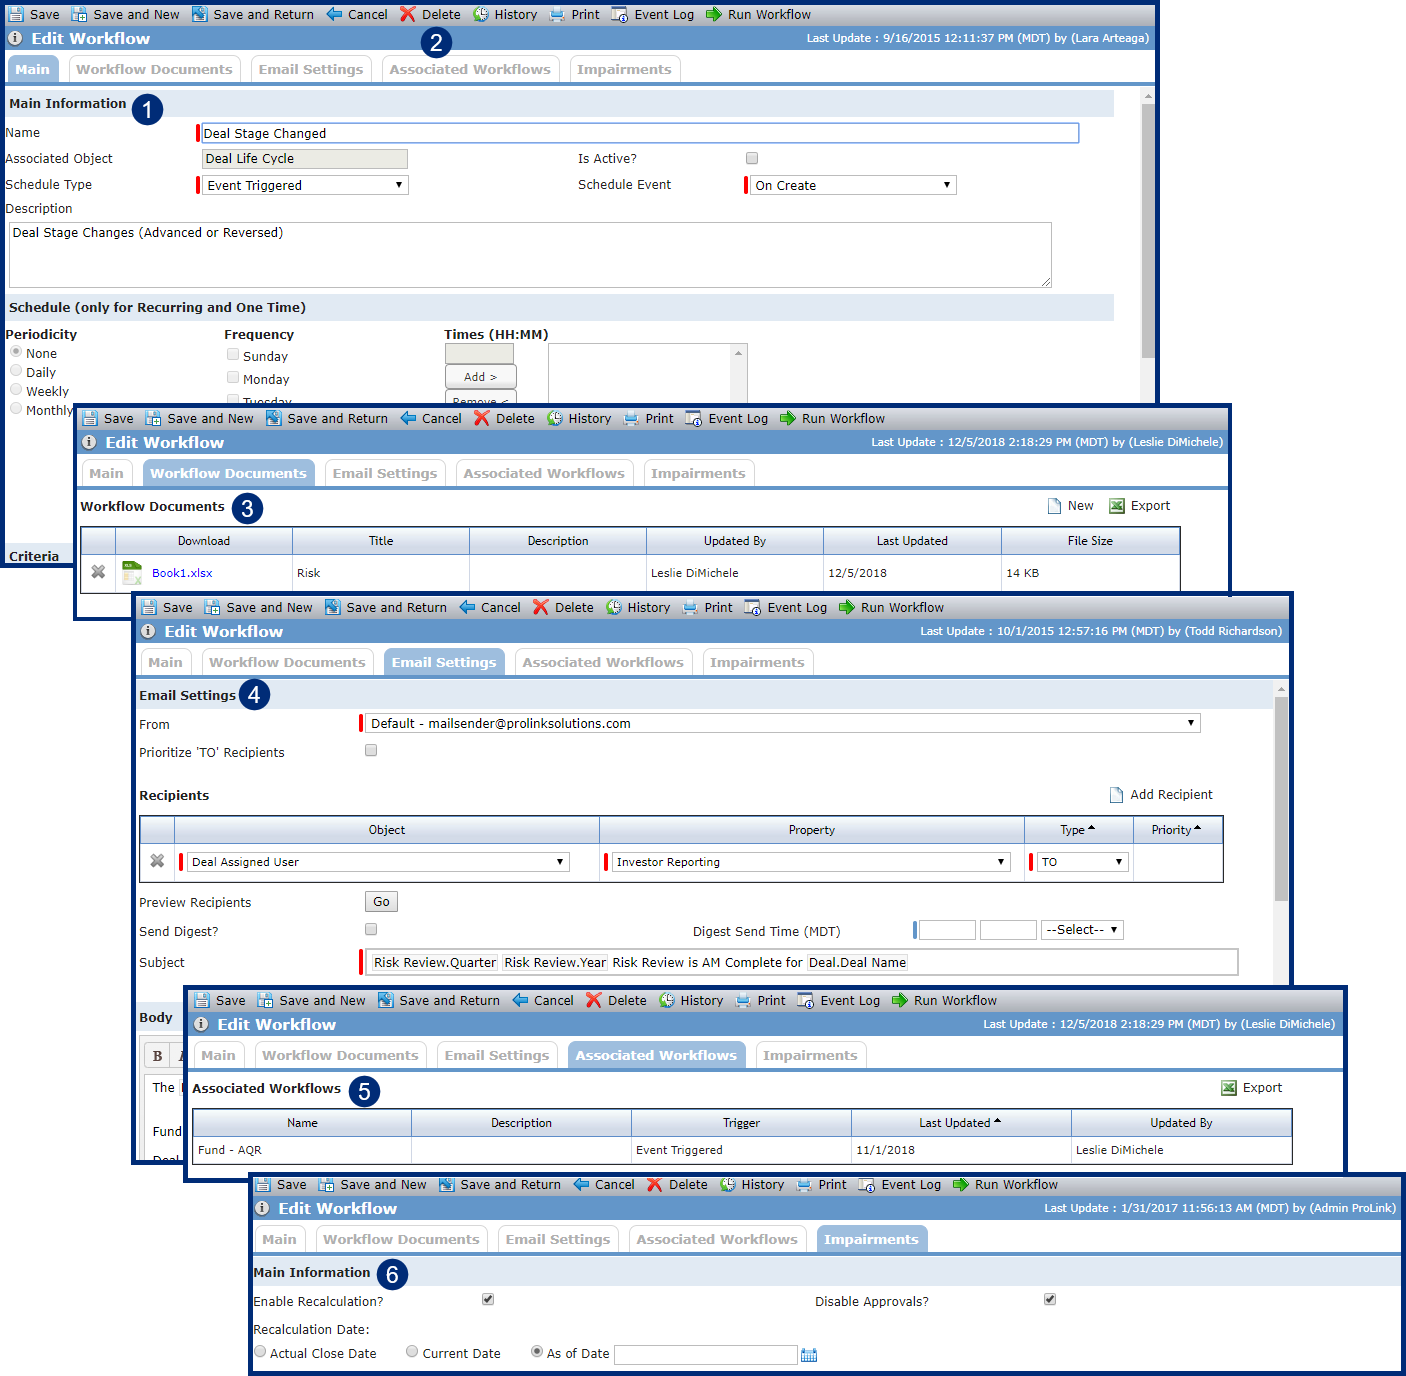
From this screen, you can:
Edit the workflow.
Delete the workflow.
View and manage the workflow documents associated to the workflow.
View and manage the email notifications configured for the workflow. You can configure and send automated email notifications to support various business processes. Notification can be sent to internal users and external partners.
Important
Make sure external partners are set up as entities in ProLinkAIM and included on the deal team to receive the workflow notification email.
See a list of all workflows that are associated to the same object as the selected workflow.
Execute impairment recalculation for all deals in the application. This tab is independent of the other workflow details.
Important
To set up a workflow, you need:
Security privileges to view and modify/add workflows.
To know the associated object for the workflow. After you select an associated object and save the workflow, the associated object cannot be changed.
To plan the schedule type, periodicity, and criteria to achieve the expected result.
Navigate to the Admin menu, and then select Workflow in the left navigation panel.
The List Workflows screen opens.
Verify that a similar workflow has not already been established in the application.
Click New in the top toolbar.
A blank Edit Workflow screen opens. As you complete the fields on the screen, drop-down lists will dynamically update, and other fields or areas of the screen become enabled.
Enter the Name of the workflow. We recommend naming your workflows in a way that reflects the general goal of the workflow.
Select the Associated Object. Think of the associated object as a screen in the application.
Select the Schedule Type.
If you want the workflow to kick off based on an action occurring, then select an Event Triggered workflow. If you want the workflow to occur periodically or based on a specific point in time, then select a Recurring workflow. A One Time workflow is intended for a single occurrence.
If you selected Event Triggered for the Schedule Type, then select the Schedule Event.
Optionally, enter a Description to help identify the purpose of the workflow.
If you selected Recurring or One Time for the Schedule Type, then complete the Schedule section.
Daily Periodicity—You do not need to select a Frequency, but select a Time that the workflow should run each day. Enter the time in 24-hour (military) format.
Weekly Periodicity—Select a Frequency (at least one day) and a Time that the workflow should run.
Monthly Periodicity—Select the Frequency (at least one month), a Day of the Month, and a Time that the workflow should run.
Complete the Criteria section.
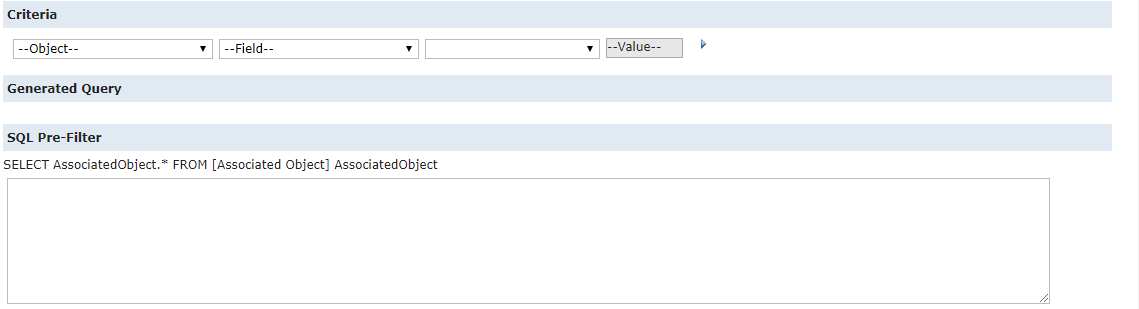
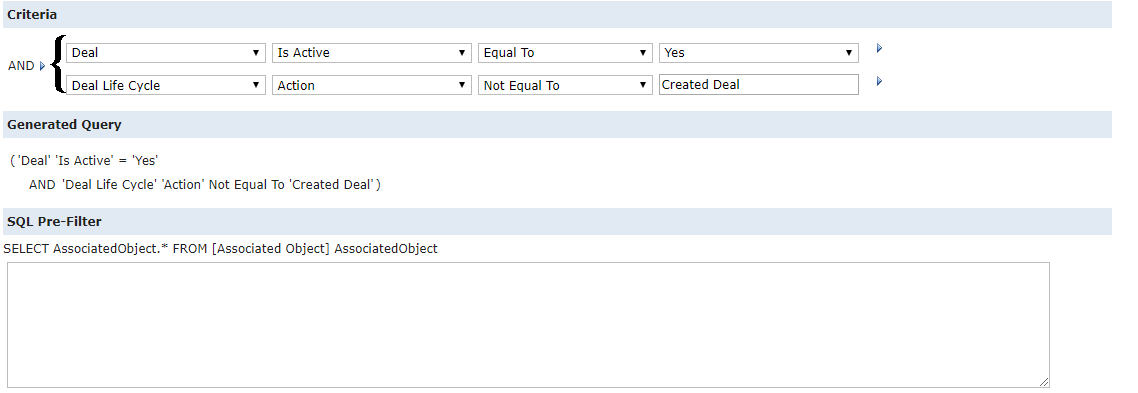
Blank (New) Criteria Section; Populated Criteria Section
Select the Object. The values in the drop-down list are objects that have a 1-to-1 or many-to-one relationship to the associated object.
Select the Field. The values in the drop-down list are all fields available for the selected object.
Select the Operator. The values in the drop-down list are comparison operators relevant to the Field selected.
Depending on the Operator selected, you might need to enter a value.
If you need additional criteria for the workflow, click
 at the end of the row, and then select AND with criteria or OR with criteria.
Even more operators are available when you click
at the beginning of a group.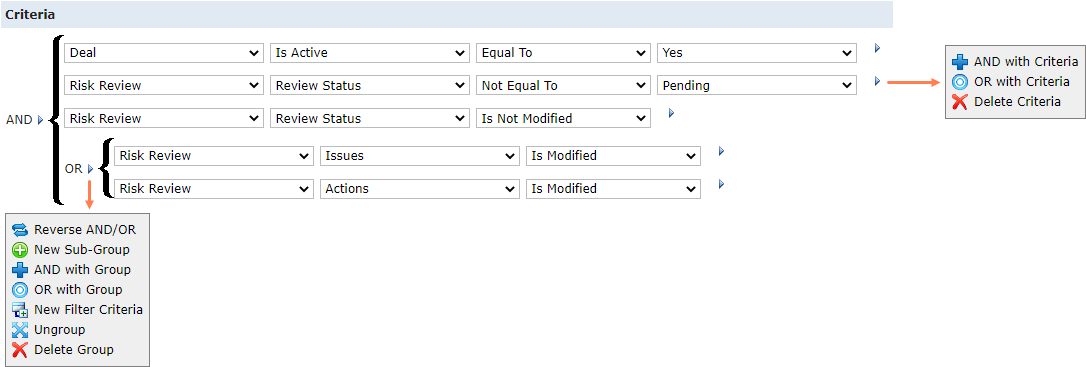 Table 1. Criteria Operators
AND with Criteria
Adds a new blank criteria row and groups it with the selected criteria. The group has the operator AND.
OR with Criteria
Adds a new blank criteria row and groups it with the selected criteria. The group has the operator OR.
Delete Criteria
Deletes the selected criteria row from the filter.
Reverse AND/OR
Changes the operator of the group. If the group had the AND operator, it becomes OR, and vice versa.
New Sub-Group
Adds a new sub-group to the group. The operator of the new sub-group should be the opposite of the operator of the parent group. Also adds two blank criteria rows to the new sub-group.
AND with Group
Creates a new parent group and places the selected group within the new parent group. Also adds a new criteria row to the new parent group. The new parent group has the operator AND.
OR with Group
Creates a new parent group and places the selected group within the new parent group. Also adds a new criteria row to the new parent group. The new parent group has the operator OR.
New Filter Criteria
Adds a new blank filter criteria row to the selected group.
Ungroup
Moves all criteria and sub-groups of the selected group to its parent group and deletes the selected group.
Delete Group
Deletes the selected group, all sub-groups, and the criteria rows from the filter. If the selected group is the top-level group, it is replaced with a single blank criteria row.
Below the criteria, the Generated Query section shows a textual description of the filter to help you determine the intended results of the filter.
Note
The SQL Pre-Filter section allows you to use T-SQL (Transact-SQL) to create a more robust criteria selection than what might be available using the Criteria section. Use this section only if you cannot create the workflow with the Criteria selections available.
You cannot use the SQL Pre-Filter functionality for event triggered workflows.
Click Save.
Upon save, additional tabs become available. You can now add a document(s) to the workflow and configure email notifications for the workflow, if needed.
The Workflow Documents tab is a helpful way to see the documents associated to the workflow. This tab allows you to identify the documents to attach to the workflow's email. The system derives the actual attachment(s) for the workflow email from the attachment(s) identified in the Email Settings.
Select the workflow from the List Workflows screen.
The Edit Workflow screen opens.
Click the Workflow Documents tab.
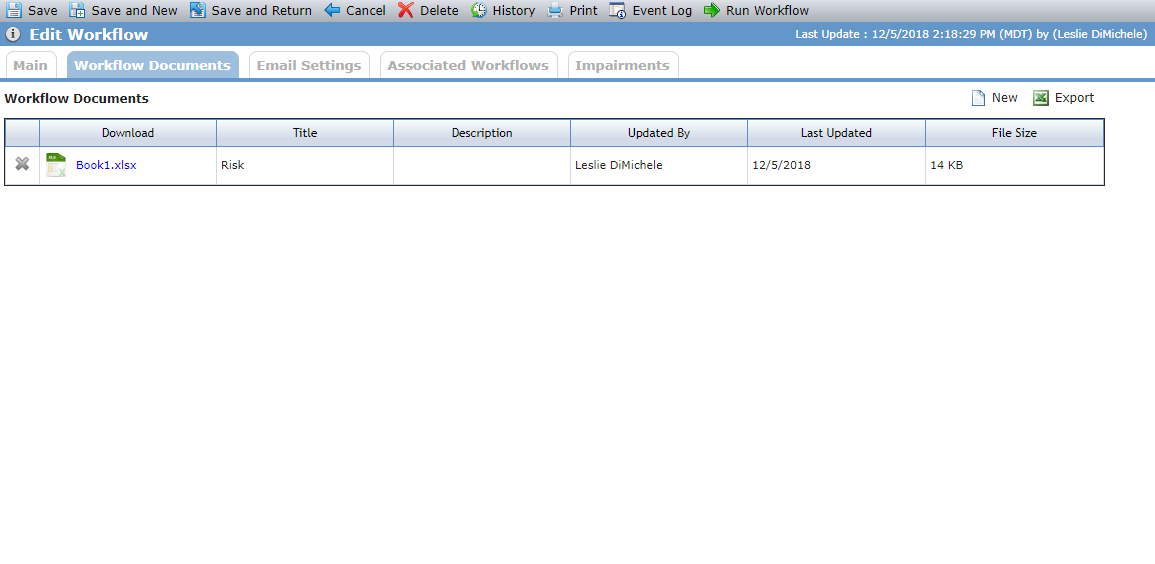
Click New.
The Find Documents popup opens, displaying the documents available in Template Documents (ProLink Admin panel).
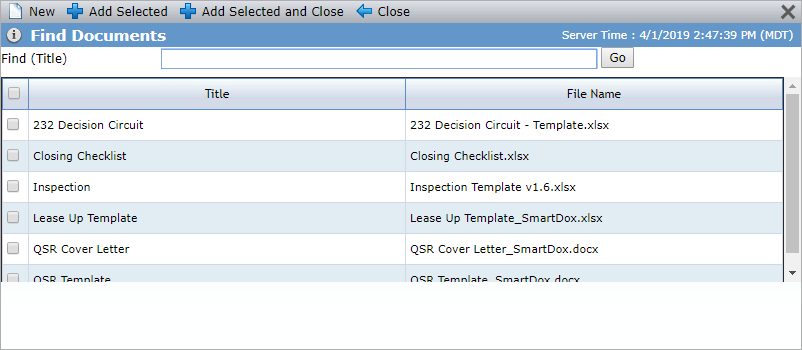
Search for the file. The application searches all documents that have been added to the application through Templates.
Enter the search criteria, and then click Go.
Select the file(s) to add.
Click Add Selected and Close.
Note
If the document doesn't exist in Templates, you can click New in the top menu bar to open the Edit Template Document screen, where you can add a new document, making it available for selection on the workflow.
Click Save.
Note
To remove a template document from a workflow, click
 at the beginning of the row of the document to be removed. This removes the document from the particular workflow documents list only; the document still exists in Templates and can be used by other workflows.
The Email Settings tab allows you to configure and send out automated email notifications to support various business processes. You can add internal users who have ProLinkAIM user records and external partners who have entity records with valid email addresses.
From this tab, you can add and remove recipients, create the body of the email including dynamic fields based on the associated object, and add file attachments that can include doing a SmartDox "get" automatically if the file is mapped using SmartDox.
Tip
If you remove or inactivate users from ProLinkAIM that are on a workflow, the workflow will generate an error. Remember to remove users from workflows if you remove or inactivate them from the application.
Select the workflow from the List Workflows screen.
The Edit Workflow screen opens.
Click the Email Settings tab.
To add a recipient, click Add Recipient above the Recipients grid, and then complete the recipient row that is added to the grid.

Object—The drop-down list is dynamic based on the associated object selected for the workflow. For example, the list might include User, Deal Assigned User, or Business Unit.
Property—The drop-down list shows any attribute to the object that has an email address. For example, if the Object is User, then Property shows a list of all application users.
Type—Select TO, CC, or BCC for the recipient.
Priority—This column displays a text box for rows where the recipient type is TO, if the Prioritize TO Recipients checkbox is selected.
If prioritized, only one TO recipient is sent the email. For example, if an entity exists on a deal in the role for priority 1, then it receives the email. If there is no entity on the deal in the role for priority 1, the application evaluates the recipient in priority 2, and so on.
Click Go next to Preview Recipients to have the application send you an email of the recipient list as of the current setup.
Select the Send Digest checkbox to have the application group emails triggered by the workflow into one email per day per recipient. For example, if the workflow might trigger a dozen emails to a property manager in one day, consider setting up the email as a digest.
You will need to identify the Digest Send Time if the Schedule Type is Event Triggered. If the Schedule Type is Recurring or One Time, then the send time is based on the Schedule Time on the Main tab.

Caution
Be careful when using dynamic fields in the subject line of digest emails; for example, the application won't know what deal name to use if the digest contains emails for multiple deals.
Optionally, select the Digest Documents checkbox to include the attachment(s) only once in the digest email. When the checkbox is cleared (default), the workflow includes a copy of the attachment(s) for each triggered event included in the digest.
Enter the Subject line for the email. Click
 to open a popup to insert dynamic fields. Dynamic fields allow specific values for an object, such as the exact deal name.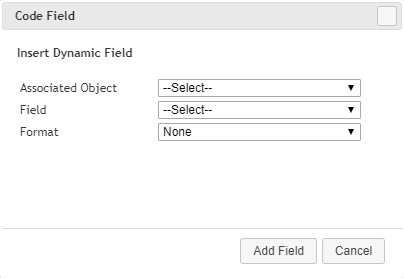
Associated Object—The drop-down list shows any object that has a 1-to-1 or many-to-one relationship with the associated object of the workflow.
Field—The drop-down list is dynamic based on the associated object selected for the dynamic field.
Format—You can specify the type of formatting that should be applied to the dynamic field. For example, if the field is a numeric value, you can specify how many decimal places to be displayed.
Enter the text of the email in the Body section. This is a free-form area that allows alphanumeric and special characters.
Dynamic fields—You can add dynamic fields to the body of the email in the same way as in the subject line.
Formatting—This section includes some of the same formatting options as most email editors.

Include Application Link—Select this checkbox, located below the Body section, to include a link to ProLinkAIM at the end of the email message. Once the user is logged in, the link opens the property or deal that the workflow was triggered from.
To add an attachment, click New above the Attachments grid, and then complete the attachment row that is added to the grid.
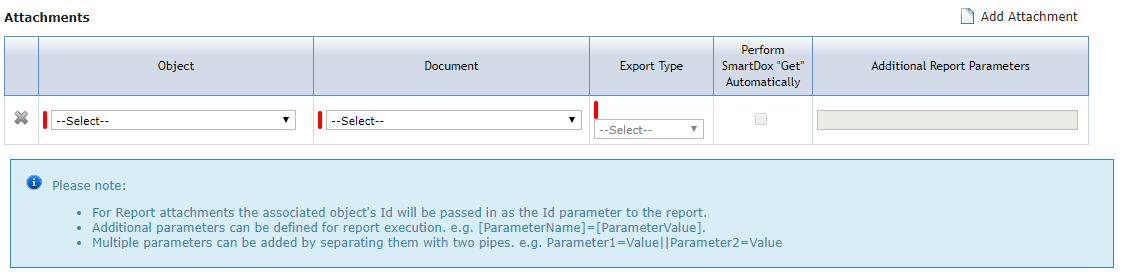
Object—Select Workflow Document or (SSRS) Report in the drop-down list.
Document—The drop-down list is dynamic based on the documents available in Template Documents and the Reports in the application.
Export Type—The format in which the report should be sent (typically, Excel, PDF, or Word).
Perform SmartDox "Get" Automatically—This checkbox is available if the file selected is a SmartDox template and is compatible with the associated object of the workflow. The SmartDox schema of the template must match the workflow's object (that is, a Deal-based workflow can only Get data from a Deal-mapped template).
Additional Report Parameters—Specify additional report filtering that might be needed to attach the selected report.
Click Save.
Note
To delete everything that is set up on the Email Settings tab, click Delete Email Settings near the top of the tab.
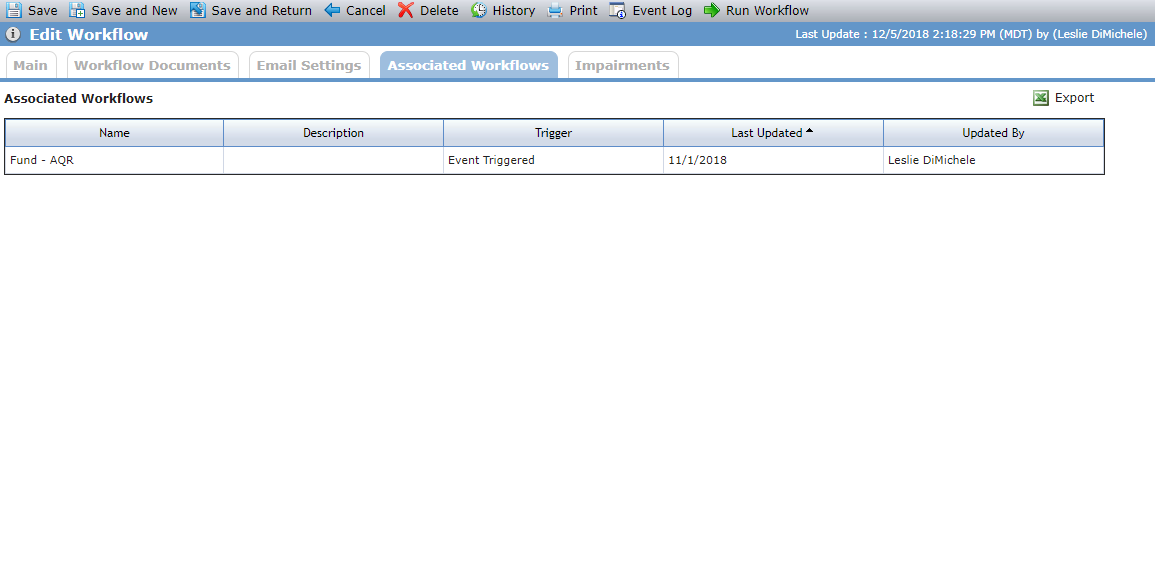
The Associated Workflows tab displays a list of all the active workflows that are associated to the same object as the given workflow. (The associated object of the workflow is on the Main tab.) This information assists you in avoiding creating a duplicate workflow. It also serves as guidance on creating criteria for a new workflow because you can see the other workflows for the same associated object.
You can recalculate impairment on a deal—deal by deal. To save time, you can also execute the impairment calculation process for all deals based on the Impairment Method selected for each deal. You can initiate the latter from the Impairments tab on the Edit Workflow screen, which allows impairment recalculation of all deals that meet the workflow criteria. The recalculation can be based on each deal's actual close date, the current date, or a specific date in time. The date cannot be in the future.
For more information about deal impairments, see Impairments.
Select a workflow from the List Workflows screen. The workflow's associated object must be a deal or child of a deal to see the Impairments tab.
The Edit Workflow screen opens.
Click the Impairments tab.
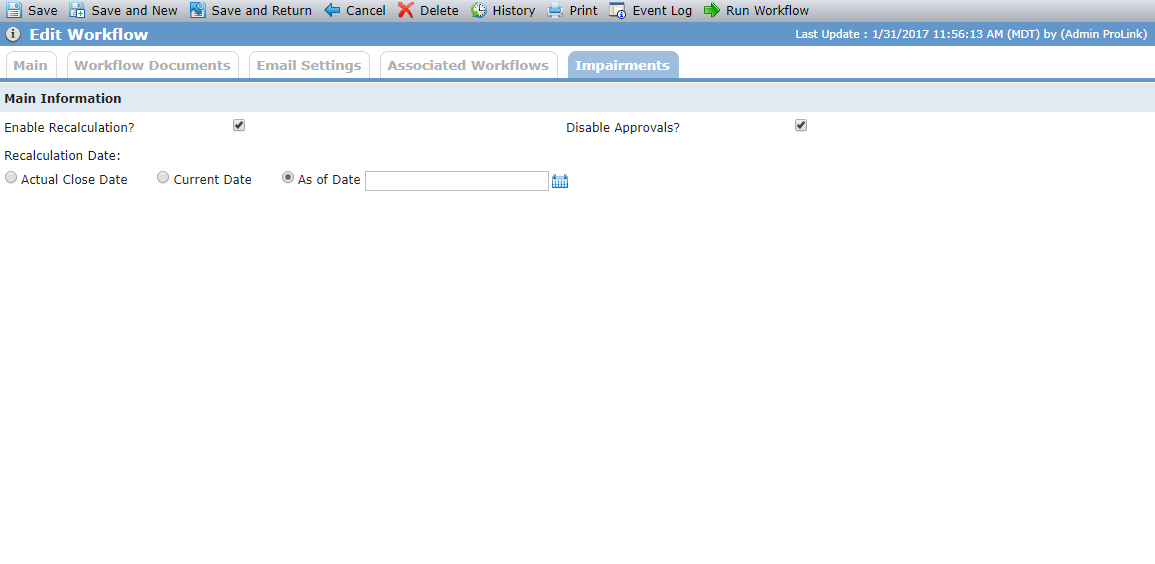
Select the Enable Recalculation checkbox.
When an impairment recalculation is made for a deal, an Impairment Approval record is created. When using this bulk recalculation, a large number of Impairment records could be created. To minimize the number of Impairment Approval records that are created, select the Disable Approvals checkbox so that these records are not created.
Specify whether the calculation is based on the deal's actual close date, the current calendar date, or any other manually entered date.
Click Save.
The recalculation is triggered by the workflow. For example, if the workflow is Event Triggered, the recalculation occurs for the deal(s) when the triggering event occurs. If the workflow is Recurring, the recalculation occurs at the scheduled date and time.
When the recalculation is run, an event log reports those deals/legal entities that were and were not updated. For those not updated, the system displays a validation message.
Message | Potential Cause |
|---|---|
No Impairment Entities to Process. |
|
Unable to perform impairment calculations, the Impairment method is not set on the deal. | No Impairment Method selected on Deal Details |
Unable to determine start date in order to recalculate impairment. | No finalized ownership structure on deal |
The actual close date on the NMTC deal is not set. | No Actual Close Date exists for the deal |
Impairment Schedule cannot be calculated because the final year of the Impairment Schedule cannot be determined. | No Benefit Schedule exists |
The top menu bar of the Edit Workflow screen includes a number of buttons that provide additional options.

Button | Action Description |
|---|---|
Delete | Click Delete to delete the selected workflow from ProLinkAIM. |
Event Log | Click Event Log to open the Workflow Event Log screen, which shows the history of the workflow's activity. This is a helpful page to review whether the workflow is triggering as expected or if there are errors. 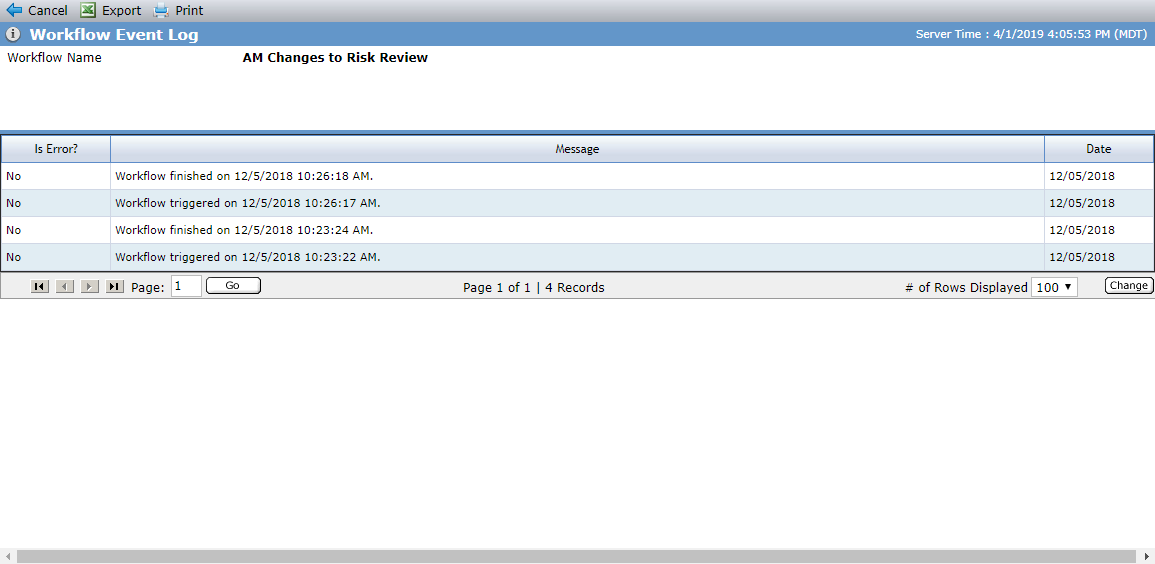 The Email Log screen (ProLink Admin panel) displays a record for each email that the system attempted to send and whether the send was successful. |
Run Workflow | Click Run Workflow to trigger the workflow immediately based on the criteria; for example, if the application hasn't triggered the workflow according to its configured schedule for some reason and you want to kick it off. CautionUse this option with caution. Running the workflow outside of its schedule could trigger mass or duplicate activity and emails. |
Copy | Click Copy to create a copy of the selected workflow. The new record opens. All details about the original workflow are carried to the new workflow, including setup, documents, and email settings. The new workflow's name is preceded by "Copy of". You can change the name and any other details about the new workflow, with the exception of the associated object. You need to select the Active checkbox to make the copy of the workflow active in order for it to trigger. |
You can deactivate a workflow by clearing the Is Active checkbox on the Main tab.
Examples
The following table shares some examples of workflows that organizations might use. Use these examples to guide workflow creation to support your own organization's processes.
Object | Schedule Type | Schedule or Schedule Event | Criteria | Description |
|---|---|---|---|---|
Annual Financials | Recurring | Daily | Annual Financial Date is Empty AND Annual Financial Due Date is before Current Date AND OPA Annual Financials - Is Required = Yes | You could have a workflow that notifies the partnership that the Annual Financial is past due. |
Cash Flow Distribution Invoice - General Partner | Recurring | Monthly | Cash Flow Distribution InvoiceApproved Date is not empty AND Cash Flow Invoice Sent Date is empty | A workflow can notifiy the General Partner that funds are required to pay out fees. |
Risk Review | Event Triggered | On Update | Risk Review - Review Status is Modified AND Risk Review - Review Status equal to Approved | You might want to set up a workflow to notify the Investor Relations group that the Risk Review has been approved. |
Tax Return | Recurring | Daily | Tax Return Completed Date is empty AND Tax Return Due Date is 7 days after Today | This workflow can be used to notify the Accountant that tax returns are due in a week. |